
Docker Swarm: The way to continuous deployment
Docker Swarm is available in two editions. As a stand-alone solution, the older variant requires a slightly more complex set-up with its own key-value store. The newer variant, also called “swarm mode”, has been part of the Docker Engine since Docker 1.12 and no longer needs a special set-up. This article only deals with swarm mode as it is recommended by the official authorities and has been developed more intensively. Before we delve deeper into the Swarm, let’s first look at what Docker Services are and how they relate to the well-known Docker Images and containers.
Docker Swarm: From containers to tasks
Traditionally, developers use Docker Images as a means of wrapping and sharing artifacts or applications. The method of using complete Ubuntu images as Docker Images (which was initially common) has already been overtaken by minimal binaries in customized operating systems like Alpine Linux. The interpretation of a container has changed from virtual machine replacement to process capsule. The trend towards minimal Docker Images enables greater flexibility and better resource conservation. This way, both storage and network are less stressed, and additionally provide smaller images with fewer features, which leads to a smaller attack surface. Therefore, starting up containers is faster, and you have better dynamics. With this dynamic, a microservice stack is really fun to use and even paves the way for projects like Functions as a Service.
However, Docker Services don’t obsolete containers, but complement configuration options, such as the desired number of replicas, deployment constraints (e. g., do not set up proxy on the database node) or update policies. Containers with their service-specific properties are called “tasks” in the context of services. Tasks are therefore the smallest unit that runs within a service. Since containers are not aware of the Docker Swarm and its service abstraction, the task acts as a link between swarm and container.
You can set up a service, for example, based on the image nginx:alpine, with three replicas so that you receive a fail-safe set-up. The desired three replicas express themselves as three tasks and thus as containers, which are distributed for you by Docker Swarm on the available set of Swarm Nodes. Of course, you can’t achieve fail-safe performance just by tripling the containers. Rather, Docker Swarm now knows your desired target configuration and intervenes accordingly if a task or node should fail.
STAY TUNED
Learn more about DevOpsCon
STAY TUNED
Learn more about DevOpsCon
Dive right in
In order to make the theory more tangible, we go through the individual steps of a service deployment. The one prerequisite is a current Docker release; I am using the current version 17.07 on Docker for Mac. Incidentally, all of the examples can be followed on a single computer, but in a productive environment, they are only useful across different nodes. All aspects of a production environment can be found in the official documentation. This article will only be able to provide selected hints.
The Docker Engine starts by default with disabled Swarm Mode. To enable it, enter on the console: docker swarm init.
Docker acknowledges this command by confirming that the current node has been configured as a manager. If you have already switched the Docker Engine to Swarm Mode before, an appropriate message will be displayed.
Docker Swarm differentiates between managers and workers. Workers are available purely for deploying tasks, while managers also maintain the Swarm. This includes continuously monitoring the services, comparing them with the desired target state and possibly reacting to deviations. Three or even five nodes are set up as managers in a production environment to ensure that the Swarm manager retains its ability to make decisions in the event of a manager’s failure. These maintain the global cluster state via raft log, so that if the leader manager fails, one of the other managers assumes the role of a leader. If more than half of the managers fail, an incorrect cluster state can no longer be corrected. However, tasks that are already running on intact nodes remain in place.
In addition to the success message, the command entered above also displays a template for adding worker nodes. Workers need to reach the manager at the IP address at the very end of the command. This can be difficult for external workers under Docker for Mac or Docker for Windows because on these systems, the engine runs in a virtual machine that uses internal IP addresses.
The examples become a bit more realistic if we start more worker nodes locally next to the manager. This can be done very easily with Docker by starting one container per worker in which a Docker Engine is running. This method even allows you to try different versions of the Docker Engine without having to set up a virtual machine or a dedicated server.
In our context, when services are started on individual workers, it is also relevant that each worker must pull the required images from the Docker Hub or another registry. With the help of a local registry mirror, these downloads can be slightly optimized. That’s not everything: we set up a local registry for locally-built images, so that we aren’t forced to push these private images to an external registry such as the Docker Hub for deployment. How to set up the complete setup using scripts has already been described.
To simplify the set-up even further, Docker Compose is available. You can find a suitable docker-compose.yml, on GitHub, which starts three workers, a registry and a registry mirror. The following commands set up the necessary environment to help you understand the examples described in the article.
git clone https://github.com/gesellix/swarm-examples.git
cd swarm-examples
swarm/01-init-swarm.sh
swarm/02-init-worker.sh
All other examples can also be found in the named repository. Unless described otherwise, the commands are executed in its root directory.
The first service
After the local environment is prepared, you can deploy a service. The nginx as a triple replica can be set up as follows:
docker service create \
  --detach=false \
  --name proxy \
  --constraint node.role==worker \
  --replicas 3 \
  --publish 8080:80 \
  nginx:alpine
Most options such as -name or -publish should not be a surprise; they only define an individual name and configure port mapping. In contrast to the usual docker run, -replicas 3 directly defines how many instances of the nginx are to be started, and -constraint=… requires that service tasks may only be started on worker nodes and not on managers. Additionally, -detach=false allows you to monitor the service deployment. Without this parameter, or -detach=true, you can continue working directly on the console and the service is deployed in the background.
The command instructs the Docker Engine to download the desired image on the individual workers, create tasks with the individual configuration, and start the containers. Depending on the network bandwidth, the initial download of the images takes the longest. The start time of the containers depends on the concrete images or the process running in the container.
If you want to run a service on each active node instead of a specific number of replicas, the service can be started with –mode global. If you subsequently add new node workers to the Swarm, Docker will automatically extend the global-Service to the new nodes. Thanks to this kind of configuration, you no longer have to manually increase the number of replicas by the number of new nodes.
Commands such as docker service ls and docker service ps proxy show you the current status of the service or its tasks after deployment. But even with conventional commands like docker exec swarm_worker2_1 docker ps, you will find the instances of nginx as normal containers. You can download the standard page of nginx via browser or curl at http://localhost:8080.
Before we look at the question of how three containers can be reached under the same port, let’s look at how Docker Swarm restores a failed task. A simple docker kill swarm_worker2_1, which removes one of the three containers, is all that is needed for the Swarm to create a new task. In fact, this happens so fast that you should already see the new container in the next docker service ps proxy. The command shows you the task history, i. e. also the failed task. Such automatic self-healing of failed tasks can probably be regarded as one of the core features of container managers. With swarm/02-init-worker. sh you can restart the just stopped worker.
Docker Swarm allows you to configure how to react to failed tasks. For example, as part of a service update, the operation may be stopped, or you may want to roll back to the previous version. Depending on the context, it makes sense to ignore sporadic problems so that the service update is attempted with the remaining replicas.
Load Balancing via Ingress Network
Now, we return to the question of how the same port is bundled on three different containers in one service. In fact, the service port is not tied to the physical network interface with conventional means per container, but the Docker Engine sets up several indirections that route incoming traffic over virtual networks or bridges. Specifically, the Ingress Network was used for the request at http://localhost:8080, which can route packages to any service IP as a cross-node overlay network. You can also view this network with docker network ls and examine it in detail with docker network inspect ingress.
Load Balancing is implemented at a level that also enables the uninterrupted operation of frontend proxies. Typically, web applications are hidden behind such proxies in order to avoid exposing the services directly to the Internet. In addition to a greater hurdle for potential attackers, this also offers other advantages, such as the ability to implement uninterrupted continuous deployment. Proxies form the necessary intermediate layer to provide the desired and available version of your application.
The proxy should always be provided with security corrections and bugfixes. There are various mechanisms to ensure that interruptions at this level are kept to a minimum. When using Docker Services, however, you no longer need special devices. If you shoot down one instance of the three nginx tasks as shown above, the other two will still be accessible. This happens not only locally, but also in a multi-node Swarm. The only requirement is a corresponding swarm of docker engines and an intact ingress network.
Deployment via serviceupdate
Similar to the random or manual termination of a task, you can also imagine a service update. As part of the service update, you can customize various properties of the service. These include the image or its tag, you can change the container environment, or you can customize the externally accessible ports. In addition, secrets or configs available in the Swarm can be made available to a service or withdrawn again. Describing all the options here would go beyond the scope of the article, the official documentation will help you in detail. The following example shows you how to add an environment variable FOO and how to influence the process flow of a concrete deployment:
docker service update \
  --detach=false \
  --env-add FOO=bar \
  --update-parallelism=1 \
  --update-order=start-first \
  --update-delay=10s \
  --update-failure-action=rollback \
  proxy
At first glance, the command looks very complex. Ultimately, however, it only serves as an example of some options that you can tailor to your needs with regard to updating. In this example, the variable in the containers is supplemented by -env-add. This is done step-by-step across the replicas (-update-parallelism=1), whereby a fourth instance is started temporarily before an old version is stopped (-update-order=start-first). Between each task update, there is a delay of ten seconds (-update-delay=10s) and in case of an error, the service is rolled back to the previous version (-update-failure-action=rollback).
In a cluster of swarm managers and workers, you should avoid running resource-hungry tasks on the manager nodes. You probably don’t want to run the proxy on the same node as the database. To map such rules, Docker Swarm allows configuring Service constraints. The developer expresses these constraints using labels. Labels can be added to or removed from the docker service create and via docker service update. Labels on services and nodes can be changed without even interrupting the task. You have already seen an example above as node. role==worker, for more examples see the official documentation.
Imagine that you not only have to maintain one or two services, but maybe ten or twenty different microservices. Each of these services would now have to be deployed using the above commands. Service abstraction takes care of distributing the concrete replicas to different nodes.
Individual outages are corrected automatically, and you can still get an overview of the health of your containers with the usual commands. As you can see, the command lines still take an unpleasant length. We have not yet discussed how different services can communicate with each other at runtime and how you can keep track of all your services.

Inter-service-communication
There are different ways to link services. We have already mentioned Docker’s so-called overlay networks, which allow node-spanning (or node-ignoring) access to services instead of concrete containers or tasks. If you want the proxy configured above to work as a reverse proxy for another service, you can achieve this with the commands from Listing 1.
docker network create \
  --driver overlay \
  app

docker service create \
  --detach=false \
  --name whoami \
  --constraint node.role==worker \
  --replicas 3 \
  --network app \
  emilevauge/whoami

docker service update \
  --detach=false \
  --network-add app \
  proxy
After the creation of an overlay network app, a new Service whoami is created in this network. Then the proxy from the example above is also added to the network. The two services can now reach each other using the service name. Ports do not have to be published explicitly for whoami, but docker makes the ports declared in the image via EXPOSE accessible within the network. In this case, the whoami-Service listens within the shared network on port 80.
All that is missing now is to configure the proxy to forward incoming requests to the whoami-Service. The nginx can be configured like in Listing 2 as a reverse proxy for the whoami-Service.
upstream backend {
  server whoami;
}

server {
  listen 80;

  location / {
    proxy_pass http://backend;
    proxy_connect_timeout 5s;
    proxy_read_timeout 5s;
  }
}
The matching Dockerfile is kept very simple, because it only has to add the individual configuration to the standard image:
FROM nginx:alpine
RUN rm /etc/nginx/conf.d/*
COPY backend.conf /etc/nginx/conf.d/
The code can be found in the GitHub repository mentioned above. The following commands build the individual nginx image and load it into the local registry. Afterwards, the already running nginx is provided with the newly created image via service update:
docker build -t 127.0.0.1:5000/nginx -f nginx-basic/Dockerfile nginx-basic
docker push 127.0.0.1:5000/nginx

docker service update \
  --detach=false \
  --image registry:5000/nginx \
  proxy
The service update shows that the image name instead of 127.0.0.1 is now registry as the repository host. This is necessary because the image should be loaded from the worker’s point of view and they only know the local registry under the name registry. However, the manager cannot resolve the registry hostname, thereby not verifying the image and therefore warns against potentially differing images between the workers during the service update.
After a successful update you can check via curl http://localhost:8080 if the proxy is reachable. Instead of the nginx default page, the response from the whoami-Service should now appear. This response always looks a bit different for successive requests, because the round-robin loadbalancing mode in Docker always redirects you to the next task. The best way to recognize this is the changed hostname or IP. With docker service update -replicas 1 whoami or docker service update -replicas 5 whoami you can easily scale up or down the service, while the proxy will always use one of the available instances.
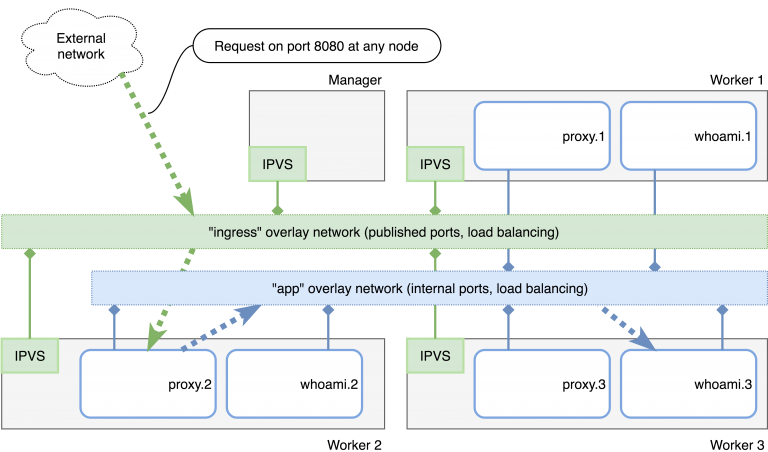
Figure 1 shows an overview of the current Swarm with three worker nodes and a manager. The dashed arrows follow the request on http://localhost:8080 through the two overlay networks ingress and app. The request first lands on the nginx task proxy. 2, which then acts as reverse proxy and passes the request to its upstream backend. Like the proxy, the backend is available in several replicas, so that the task whoami. 3 is accessed at worker 3 for the specific request.
You have now learned how existing services can be upgraded without interruption, how to react to changing load using a one-liner, and how overlay networks can eliminate the need to publish internal ports on an external interface. Other operational details are just as easy to handle, e.g. when the Docker Engines, worker or managers need to be updated or individual nodes need to be replaced. For these use cases, see the relevant notes in the documentation.
For example, a node can be instructed to remove all tasks via docker node update -availability=drain. Docker will then take care of clearing the node virtually empty, so that you can carry out maintenance work undisturbed and without risk. With docker swarm leave and docker swarm join you can always remove or add workers and managers. You can obtain the necessary join tokens from one of the managers by calling docker swarm join-token worker or docker swarm join-token manager.
Docker Stack
As already mentioned, it is difficult to keep track of a growing service landscape. In general, Consul or similar tools are suitable for maintaining a kind of registry that provides you with more than just an overview. Tools such as Portainer come with support for Docker Swarm and dashboards that give you a graphical overview of your nodes and services.
Docker offers you a slim alternative in the form of Docker Stack. As the name suggests, this abstraction goes beyond the individual services and deals with the entirety of your services, which are closely interlinked or interdependent. The technological basis is nothing new, because it reuses many elements of Docker Compose. Generally speaking: Docker Stack uses Compose’s YAML format and complements the Swarm-specific properties for service deployments. As an example, you can find the stack for the manually created services under nginx-basic/docker-stack.yml. If you want to try it instead of manually setting up services, you must first stop the proxy to release port 8080. The following commands ensure a clean state and start the complete stack:
docker service rm proxy whoami
docker network rm app

docker stack deploy --compose-file nginx-basic/docker-stack.yml example
The docker stack deploy command receives the desired stack description via -compose-file. The name example serves on the one hand as an easily recognizable reference to the stack and internally as a means of namespacing the various services. Docker now uses the information in the docker-stack.yml to generate virtually the equivalent of the docker service create … commands internally and sends them to the Docker Engine.
Compared to Compose, there are only some new blocks in the configuration file – the ones under deploy, which, as already mentioned, define the Swarm-specific properties. Constraints, replicas and update behavior are configured appropriately to the command line parameters. The documentation contains details and other options that may be relevant to your application.
The practical benefit of the stacks is that you can now check in the configuration to your VCS and therefore have complete and up-to-date documentation on the setup of all connected services. Changes are then reduced to editing this file and the repeated docker stack deploy -compose-file nginx-basic/docker-stack.yml example. Docker checks on every execution of the command if there are any discrepancies between the YAML content and the services actually deployed and corrects them accordingly via internal docker service update. This gives you a good overview of your stack. It is versioned right along the source code of your services and you need to maintain far less error-prone scripts. Since the stack abstraction is a purely client-side implementation, you still have full freedom to perform your own actions via manual or scripted docker service commands.
If the constant editing of docker-stack.yml seems excessive in the context of frequent service updates, consider variable resolution per environment. The placeholder NGINX_IMAGE is already provided in the example stack. Here is the relevant excerpt:
...
services:
  proxy:
    image: "${NGINX_IMAGE:-registry:5000/nginx:latest}"
...
With an appropriately prepared environment, you can deploy another nginx image without first editing the YAML file. The following example changes the image for the proxy back to the default image and updates the stack:
export NGINX_IMAGE=nginx:alpine
docker stack deploy --compose-file nginx-basic/docker-stack.yml example
The deployment now runs until the individual instances are updated. Afterwards, a curl http://localhost:8080 should return to the nginx default page. The YAML configuration of the stack thus remains stable and is adapted only by means of environment variables.
The resolution of the placeholders can be done at any position. In practice, it would therefore be better to keep only the image tag variable instead of the complete image.
...
services:
  proxy:
    image: "nginx:${NGINX_VERSION:-alpine}"
...
Removing a complete stack is very easy with docker stack rm example.
Please note: all services will be removed without further enquiry. On a production system, the command can likely be considered dangerous, but it makes handling services for local set-ups and on test stages very convenient.
As mentioned above, the stack uses namespacing based on labels to keep different services together, but it works with the same mechanisms as docker service… commands. Therefore, it is up to you to supplement a stack initially deployed via docker stack deploy with docker service update during operation.
Secrets and service-configs
Docker services and stack offer you more than only the management of tasks across different nodes. Secrets and configs can also be distributed more easily using Docker Swarm and are more securely stored in only those container file systems that you have authorized, compared to the environment variables recommended at https://12factor.net/.
Basically, Docker Secrets and Configs share the same concept. You first create objects or files centrally in Swarm via docker secret create… or docker config create…, which are stored internally by Docker – Secrets are encrypted beforehand. You give these objects a name, which you then use when you link them to services.
Based on the previous example with nginx and extracts from the official docker documentation, we can add HTTPS support. Docker Swarm mounts the necessary SSL certificates and keys as files in the containers. Secrets only end up in a RAM disk for security reasons. First, you need suitable certificates that are prepared in the repository under nginx-secrets/cert. If you want to update the certificates, a suitable script nginx-secrets/gen-certs.sh is available.
Docker Swarm allows up to 500 KB of content per secret, which is then stored as a file in /run/secrets/. Secrets are created as follows:
docker secret create site.key nginx-secrets/cert/site.key
docker secret create site.crt nginx-secrets/cert/site.crt
Configs can also be maintained similarly to secrets. By looking at the example of the individual nginx configuration from the beginning of the article, you will soon see that the specially built image will no longer be necessary. To configure the nginx, we use the configuration under nginx-secrets/https-only.conf and create it using Docker Config:
docker config create https.conf nginx-secrets/https-only.conf
First, you define the desired name of the config. Then you enter the path or file name, for the contents you want Docker to store in the Swarm. With docker secret ls and docker config ls you can find the newly created objects. Now all that’s missing is the link between the service, and the Swarm Secrets and Config. For example, you can start a new service as follows. Note that the official nginx image is sufficient:
docker service create \
  --detach=false \
  --name nginx \
  --secret site.key \
  --secret site.crt \
  --config source=https.conf,target=/etc/nginx/conf.d/https.conf \
  --publish 8443:443 \
  nginx:alpine
In the browser you can see the result at https://localhost:8443, but you have to skip some warnings because of the self-issued Certification Authority of the server certificate. In this case the check is easier via command line:
curl --cacert nginx-secrets/cert/root-ca.crt https://localhost:8443
Secrets and configs are also supported in Docker Stack. To match the manual commands, the Secret or Config is also declared and, if necessary, created within the YAML file at the top level, while the link to the desired services is then defined for each service. Our complete example looks like shown in Listing 3 and can be deployed as follows:
cd nginx-secrets
docker stack deploy --compose-file docker-stack.yml https-example
version: "3.4"

services:
  proxy:
    image: "${NGINX_IMAGE:-nginx:alpine}"
    networks:
      - app
    ports:
      - "8080:80"
      - "8443:443"
    deploy:
      placement:
        constraints:
          - node.role==worker
      replicas: 3
      update_config:
        parallelism: 1
        delay: 10s
      restart_policy:
        condition: any
    configs:
      - source: https.conf
        target: /etc/nginx/conf.d/https.conf
    secrets:
      - site.key
      - site.crt
  whoami:
    image: emilevauge/whoami:latest
    networks:
      - app
    deploy:
      placement:
        constraints:
          - node.role==worker
      replicas: 3
      update_config:
        parallelism: 1
        delay: 10s
      restart_policy:
        condition: on-failure

networks:
  app:
    driver: overlay

configs:
  https.conf:
    file: ./https-backend.conf

secrets:
  site.key:
    file: ./cert/site.key
  site.crt:
    file: ./cert/site.crt
Updating secrets or configs is a bit tricky. Docker cannot offer a generic solution for updating container file systems. Some processes expect a signal like SIGHUP when updating the configuration, others do not allow a reload, but have to be restarted. Docker therefore suggests to create new secrets or configs under a new name and replace them with the old versions by docker service update -config-rm -config-add…
STAY TUNED
Learn more about DevOpsCon
Stateful services and volumes
If you want to set up databases via docker service, you will inevitably be asked how the data will survive a container restart. You are probably already familiar with volumes to address this challenge. Usually, volumes are connected very closely to a specific container, so that both are practically one unit. In a swarm with potentially moving containers, such a close binding can no longer be assumed – a container can always be started on another node where either the required volume is completely missing, is empty or even contains obsolete data. From data volumes in the order of several gigabytes upwards, it is no longer useful to copy or move volumes to other nodes. Of course, depending on the environment you have several possible solutions.
The basic idea is to select a suitable volume driver, which then distributes the data to different nodes or to a central location. Docker therefore allows you to select the desired driver and, if necessary, configure it when creating partitions. There are already a number of plug-ins that connect the Docker Engine to new Volume Drivers. The documentation shows an extensive selection of these plug-ins. You may find the specific NetApp or vSphere plug-ins in your environment appropriate. Alternatively, We recommend the REX-Ray plug-in for closer inspection, as it enjoys a good reputation in the community and it is quite platform-neutral.
Since the configuration and use of the different volume plug-ins and drivers is too specific for your specific environment, I will not include a detailed description here. Please note that you must use at least Docker 1.13 or in some cases even version 17.03. The necessary docker-specific commands can usually be reduced to two lines, which are listed as examples for vSphere in Listing 4.
docker plugin install \
  --grant-all-permissions \
  --alias \
  vsphere vmware/docker-volume-vsphere:latest
docker volume create \
  --driver=vsphere \
  --name=MyVolume \
  -o size=10gb \
  -o vsan-policy-name=allflash
In addition to installing the plug-in under an alias vsphere, the second step is to create the desired MyVolume volume. Part of the configuration is stored in the file system, while you can configure individual parameters by -o at the time of volume creation.
Proxies with true docker swarm integration
Using the example of nginx, it was very easy to define statically the known upstream services. Depending on the application and environment, you may need a more dynamic concept and want to change the combination of the services more often. In today’s microservices environment, the convenient addition of new services marks a common practice. Unfortunately, the static configuration of a nginx or HAProxy will then feel a bit uncomfortable. But fortunately, there are already convenient alternatives, of which Træfik is probably the most outstanding. Plus, it comes with excellent docker integration!
Equivalent to the first stack with nginx, you will find the same stack with Træfik. Træfik needs access to a Swarm Manager’s Docker Engine API to dynamically adapt its configuration to new or modified services. It is therefore placed on the manager nodes using deployment constraints. Since Træfik cannot guess certain service-specific settings, the relevant configuration is stored on the respective services through labels.
In our example, you can see how the network configuration (port and network) is defined, so the routing will still reach the service, even if it is in multiple networks. In addition, the traefik.frontend.rule defines for which incoming requests packages should be forwarded to the whoami service. Besides routing based on request headers, you can also use paths and other request elements as criteria. See the Træfik documentation for respective information.
Finally, there are more details on integration with Docker Swarm in the Swarm User Guide. The example stack is still missing the configuration for HTTPS support, but since Træfik comes with native integration for Let’s Encrypt, We only have to refer to appropriate examples.
Conclusion
Docker Swarm offers even more facets than shown, which may become more or less relevant depending on the context. Functions such as scheduled tasks or pendants to cron jobs as services are often requested, but currently difficult to implement with built-in features. Nevertheless, compared to other container orchestrators, Docker Swarm is still neatly arranged and lean. There are only a few hurdles to overcome in order to quickly achieve useful results.
Docker Swarm takes care of many details as well as the configurable error handling, especially for Continuous Deployment. With Docker Swarm, you don’t have to maintain your own deployment code and you even get some rudimentary load balancing for free. Several features such as autoscaling can be supplemented via Orbiter and adapted to your own needs. The risk of experimentation remains relatively low because Docker Swarm has little invasive effect on the existing infrastructure. In any case, it’s fun to dive right in with Swarm – whether via command line, YAML-file or directly via Engine-API.